Tips For Setting Up The New Google Analytics 4
If you don’t already have Google Analytics 4 (GA4) set up for your website or app, our team at Blue Compass can help you get started. GA4 is the latest version of Universal Analytics (UA) which will no longer process data as of July 1, 2023. This means getting GA4 set up now is the only way to start collecting historical data you otherwise would miss out on once this change happens. To help you get ahead of the transition, our digital marketing experts outline their recommendations for setting up GA4.
Google Analytics 4 Vs. Universal Analytics
GA4 takes a different approach to data collection than Universal Analytics. Where UA was a session-based tracking platform, GA4 has transitioned to event-based tracking. This means instead of focusing on sessions and hits from users, businesses must shift their focus to the users themselves to gain insight into how they’re behaving throughout the customer journey.
Learn more about how Google Analytics 4 is different and why you should make the switch sooner rather than later in our introductory GA4 blog.
Setting Up Google Analytics 4
Below, our team outlines recommendations to help walk you through the GA4 setup process. Once complete, you will have access to improved website reporting and can begin accruing historical data. Come July next year new data will only flow into GA4 properties. It is therefore essential to begin the migration process of your website into GA4 as early as possible. Let’s get started!
Google Tag Manager (GTM) And Analytics 4
Google Tag Manager is a free tag management system that allows you to manage and deploy marketing tags without having to modify the code of your website. For that reason, implementing GA4 via Google Tag Manager simplifies the implementation process and reduces the likelihood of breaking portions of your website.
Below we’ve highlighted a couple of best practices when implementing GA4 via GTM, why they're important and how to follow them.
Google Analytics 4 Implementation Via Google Tag Manager
While GA4 has made adding events and conversions much easier, in most cases, it still has its limitations. To implement GA4 via Google Tag Manager, simply follow the steps below:
- Click Tags > New.
- Click Tag Configuration.
- Select Google Analytics: GA4 Configuration.
- Enter your measurement ID (this is found in the top right corner of the Web Stream Details page in Google Analytics).
- Keep the ‘Send a page view event when this configuration loads’ option checked to automatically send page views.
- Click Triggering and use the Initialization trigger to ensure the GA4 Configuration tag fires before other triggers (the reasoning behind this step is further explained below).
- Click Triggering and select appropriate events that would cause the tag to fire.
- Save the tag configuration and publish your container.
Trigger GA4 Tag On Initialization
Now that you’ve created the GA4 tag and added it to your website, our team recommends having the GA4 tag fire on the initialization of each page of the website or application.
Using the Initialization trigger for GA4 will ensure any data is pulled into Analytics properly before other tags fire. This will be especially important if your website uses single-page applications (SPAs) via popular development frameworks like React, Vue and Angular.

The Initialization trigger is designed to fire before all other triggers except Consent Initialization triggers. Each web container in Google Tag Manager includes an Initialization - All Pages trigger by default. Selecting this trigger will fire any tags that should fire before other triggers.
Run GA4 Parallel To Universal Analytics
Implement GA4 alongside Universal Analytics so you can begin gathering data for historical analysis. By running and checking both tools, you can compare similar metrics between Universal Analytics and GA4 and make sure your new setup is on track to collect the information you want.
There are several other reasons you should run both until the July 1, 2023, deadline, including but not limited to the following:
- Aggregation of historical data.
- Ease and reliability of data comparison.
- Ability to compare proper implementation.
- Assurance that, at a minimum, some data is being appropriately gathered regardless of any possible implementation issues.
Migrate Standard Universal Analytics Events
GA4 comes with the option to inherently gather data for several common Event types. We recommend beginning by utilizing the built in tracking features via the “Collect Universal Analytics Events” toggle. Starting with these events allows you to minimize the custom tags and triggers that need to be implemented through Google Tag Manager. Additional tags will most likely be needed for comprehensive data collection.
Running both UA and GA4 at the same time will allow GA4 to automatically collect standard conversion tracking events from your Universal Analytics property. While this is a convenient tool, the event action will be added as the event name by default while the category and label will be added as custom parameters. If your actions are not consistent you may want to revisit your GTM, Events and Conversions strategy when considering GA4.
Follow the click path below to begin collecting your UA events in GA4:
- Navigate to your property in the admin dashboard and click on Data Streams.
- Click on the data stream you wish to enable turnkey events for.
- Select More Tagging Settings at the bottom of your screen.
- Locate the toggle on the right-hand side of the Collect Universal Analytics events option toward the bottom of your screen.
- Turn it on to begin collecting UA events.

Google Analytics 4 Settings
Setting up your new GA4 properties is one thing, but optimizing your configuration can take some time. To help speed up the process, we are here to walk you through some of the main changes to ensure optimal data collection and reporting opportunities.
Update Data Retention To 14 Months
The data retention setting in GA4 allows you to select a period of time for which your data will be restored. Any data that falls outside of the period of time selected will be permanently deleted in GA4.
The default data retention time frame for GA4 is two months, meaning any data more than two months old will be deleted. We recommend updating this setting to the longest available time frame of 14 months. This is especially important if you plan to gather any data for year-over-year reporting.
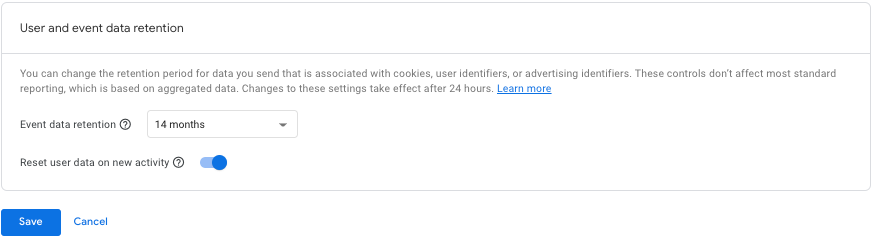
To get to this setting, start by navigating to the Data Retention page using these steps:
- Data retention settings can be found directly below data settings in the admin dashboard.
- To get there, click into admin settings in the bottom left-hand corner of your screen.
- You will then want to navigate to Data Settings under your Property.
- Clicking on Data Settings will reveal three options beneath it.
- Simply click into Data Retention and ensure it is set to 14 months.
- Click save.

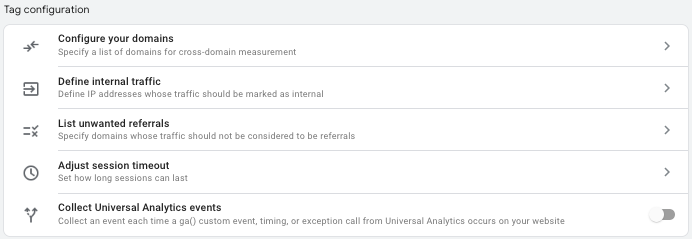
Add Your IP Address To GA4 Internal Traffic
Most of the time, Analytics is used to track how external customers and users interact with your website since internal traffic patterns are typically different from external traffic patterns. When your reporting views contain hit data from both internal and external users of your website, it might become difficult to determine how your customers are actually interacting with your website.
That is why we recommend excluding all internal traffic sources from being measured in GA4. This can be done from the Internal Traffic page and should be as specific as possible, meaning your IP traffic should be excluded independently from any other internal traffic sources.

There are two ways to exclude internal traffic. For the first:
- Navigate to Data Filters beneath Data Settings in the admin dashboard.
- Here, you can create filters by clicking the “Create Filter” button in the top right.

For the second method:
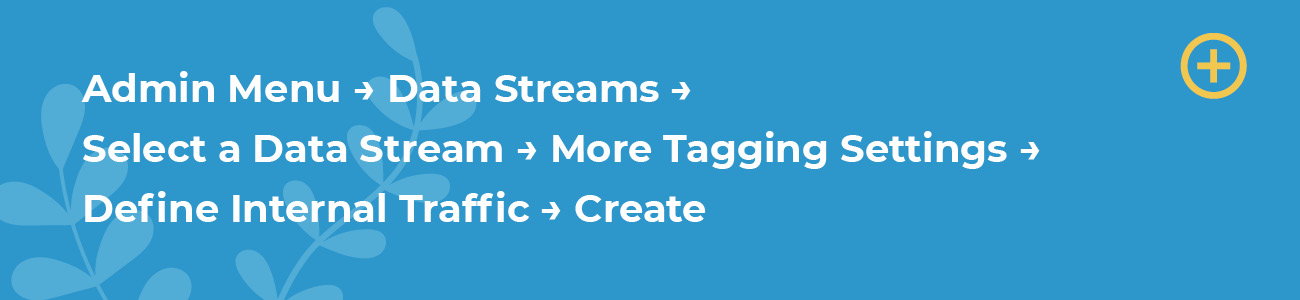
- Navigate to Data Streams in the property settings.
- Here, you can select which stream you’d like to create your filter for.
- Once you’re in the data stream, select More Tagging Settings found at the bottom of your screen.
- In here, you can Define Internal Traffic which allows you to input any IP addresses whose traffic should be marked as internal.
Move GA4 Internal Traffic Out Of Test State
By default, updates to Internal Traffic and Development Traffic tags will be moved into the Testing State. Once all of your traffic filters have been properly implemented and tested, navigate to the Data Filters page and update the Filter State to Active.
This will push your filter live, ensuring any incoming traffic that matches the IP address your filter is set to is excluded and will not be collected in your GA4 property.
Simply click into the filter you want to edit and select Active as the filter state toward the bottom of the page.

Building Custom Reports & Dashboards In GA4
Universal Analytics was known for its inflexibility and lack of customization with the caveat that you get a wide variety of pre-built reports. While GA4 comes with fewer turnkey reports, you can actually edit those reports to show and filter down to what you want along with the ability to create entirely new reports, and even report collections, within the platform. Once you have GA4 set up and your Events and Conversions firing properly, auditing and migrating the reports you currently have in Data Studio and your Universal Analytics custom reports should be one of your next considerations. You can learn more about reports in Google Analytics 4 in our GA4 intro blog.
Get In Touch With Blue Compass For More Tips On Migrating From Universal Analytics To Google Analytics 4
If you feel you need more assistance setting up Google Analytics 4, our team of experts can help! Blue Compass is always keeping up with the latest marketing trends, and we’re monitoring any announcements and changes to Google’s newest tool. To learn how Blue Compass' SEO-savvy team can navigate these changes with you and build actionable reports for you. Give us a call at (515) 868-0010, or reach out to us below.
Contact Us Today